Chicken Little Cardstock Paper: #105, #106, #107, #108, #109
Peter, Peter Pumpkin Eater Cardstock Paper: #127
The Ant’s Go Marching Cardstock Paper #324
The Ant’s Go Marching Build-A-Rubons #327
Supplies Needed:
Paper Trimmer, Scissors, Adhesive, Pop Dots, Glue Dots, Corner Rounder, Black Ink, and a Black Doodle Pen, craft knife, cutting mat, pencil, scorer, large flower punch, small flower punch

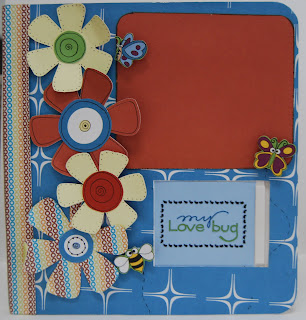
Background: #109 Blue Pattern (round right edge corners) Use page template to trace (with pencil). Use a craft knife for cutting out the slide.
4” x 5” #108 Solid Red.
(2) small flowers #107 Solid Yellow (doodle around edges and pop dot (1) small flower)
(2) large flowers #109 Solid Light Blue and #108 Solid Red (ink edges and pop dot both large flowers)
Center of flowers use #108 Circle Pattern (doodle around edges and center of small flower circles)
Cut out (2) butterflies and (1) bee from #324 Bug Pattern. Pop dot to cover. Use black pen to doodle dashes below bee and butterfly (by “My Love Bugs”)
Apply ants border and “My Love Bug” and mini green flower rub-ons to #108 Solid Red. Cut around rub-on border and pop dot to cover page.
Journal behind slide.
Spine: Cut a 2" x 6" #127 Polka Dot Piece. Wrap piece around the spine and adhere.
Back Cover: #106 Green Stripe use page template to trace. Cut out and adhere to back cover.
Page 1:
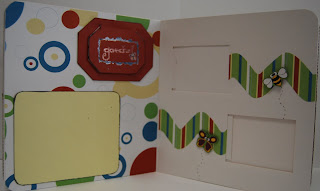
Cut 3 ½” x 7 ½” #127 Polka Dot (adhere 2” from bottom edge)
Mat photo onto #109 Blue Pattern.
Barndoor: Circle Tag to White Barndoor (mat onto #106 Solid Yellow/Green Stripe). Journal behind Barndoor.
Page 2:
3 ½” x 4” #106 Solid Yellow/Green Stripe (ink edges)
2” x 3 ½” #1#108 Solid Red (ink eges)
Mini Tag: onto #106 Green Stripe (cut out and apply mini blue flower rub-on) and pop dot to page.
3 ½” x 4” #106 Green Stripe
Cut out (2) bees from #324 Bug Pattern. Pop dot to page. Using black pen doodle dashes below bugs.
Using black pen, journal behind left slide.
Adhere photo behind right slide.
Pages 3 and 4:
Page 3:
Trace #108 Circle Pattern from Page Template and adhere to page.
Mat 4” x 5” photo onto #107 Red Stripe (solid yellow side).
Barndoor: Adhere Solid Red to White Barndoor (adhere to page).
Apply blue wavy border, “gotcha”, and butterfly rub-ons to center of barndoor.
Use black pen to journal behind the Barndoor.
Page 4:
Trace zigzag onto #106 Green Stripe.
Cut out zigzag and adhere to left and right edges of doors.
Cut out a butterfly and bee and pop dot to page. Usin black pen doodle dashes below bugs.
Adhere photos behind the slides.
Using black pen, journal on top of the slides.
Pages 5 and 6:
Page 5:
Cut out 4”x 7 ½” #107 Red Stripe. Ink edges and adhere 1" from bottom edge of page.
Cut out 1 ½” x 7 ½” #108 Circle Pattern (adhere to center of Red Stripe piece).
Mat 4”x 5” photo onto #109 Blue Pattern.
Page 6:
Trace page template onto #127. Trace around slides and cut out with craft knife.
Trace a 2" x 3" bubble onto #106 Green Stripe (yellow side). Cut out bubble and ink edges.
Apply red ants border, “got dirt?” and bee rub-ons to center of Bubble.
Adhere Bubble with pop dots.
Barndoor: Adhere Solid Yellow to White Barndoor. Ink edges and adhere photo behind Barndoor.
Adhere Barndoor to page.
Cut out blue circle from #108 Circle Pattern and adhere to center of flower.
Doodle around edges of flowers and adhere to page.
Adhere photos behind left slide.
Using black pen, journal behind right slide.
Page 7 and 8:
Page 7:
3 ½” x 8 ½” #108 Solid Light Blue (ink edges)
Adhere 1” from left edge of page (leaving right edge unglued for pocket)
Adhere flower Barndoor to white chipboard Barndoor (insert in pocket)
Mat 4” x 6” photo to #107 Red Stripe.
Page 8:
3 ¾” x 4” #107 Red Stripe.
Cut out (2) butterflies from #324 Bug Pattern.
Pop dot butterflies. Use black pen to doodle dashes below butterflies.
3” x 3 ½” #107 Red Stripe (yellow side). Round corners and ink edges. Adhere to page.
Barndoor: Blue tag onto White Barndoor and adhere to yellow piece.
Using black pen, journal behind slides on page.
Apply "looking glass border, Catch Me if you Can and a ladybug rubons to the top of the left slide.
Adhere photo to top of right slide.
Have FUN! Please email me with any questions!


Glad to see this class here.
ReplyDeleteI attended CKU Nashville and wasn´t able to finish the project.
Although I´ve tried to finish it at home, I got a little lost. Too much information at once...
Thanks,
Monica